Learn how to use SLA in Jira for better tracking, faster resolutions, and improved team performance. Explore expert tips and tools for SLA automation.
Ever dealt with ticket prioritization or unmatched customer expectations in providing services?
Whether it’s responding to support tickets on time or resolving high-priority issues, managing service delivery efficiently is one of the toughest challenges for IT and project teams.
That’s where SLA in Jira comes in — a built-in way to define, track, and meet service expectations. The primary purpose of a Service Level Agreement (SLA) is to formally define, measure, and guarantee the level of service a customer can expect from the Jira provider.
In this 2026 guide, you’ll learn how to set up, and monitor SLA in Jira, automate SLA tracking, avoid common mistakes, and use the right tools to stay compliant.
What Is SLA in Jira and Why It Matters
An SLA (Service Level Agreement) in Jira defines the commitment your team makes to respond and resolve issues within specific time limits. It’s essentially a timer that tracks how long an issue has been open and whether the target deadline was met or breached.
For example, you might define an SLA to respond to customer tickets within two hours and resolve them within one business day. These goals help teams stay accountable and transparent.
Jira’s SLA feature is available primarily in Jira Service Management, where support teams can track deadlines for each issue. But even for software teams using Jira Software, setting up SLA tracking with add-ons can improve visibility and performance monitoring.
When used effectively, SLA in Jira helps:
Improve customer satisfaction by meeting deadlines.
Measure team performance against agreed timelines.
Identify workflow inefficiencies that cause delays.
Understanding How SLAs Work in Jira
Works by using a sophisticated clock mechanism that automatically starts, pauses, and stops based on specific conditions you define. So, before configuring, you need to understand the key elements of SLA in Jira:
Start and Stop Conditions: These determine when your SLA clock starts and stops. Example: Start counting when a ticket is created; stop when it’s resolved.
Pause Conditions: Used when an issue is waiting for customer input. The SLA timer pauses during that period, ensuring fairness in measurement.
Goals: Your SLA goals define the target time within which the issue should be completed. Example: Respond within 4 hours for high-priority tickets.
Calendars: They help calculate SLA in Jira accurately by considering your business hours. If your team works from 9 a.m. to 6 p.m. Monday through Friday, the timer ignores weekends.
These parameters ensure that Jira tracks real-world performance rather than round-the-clock time.
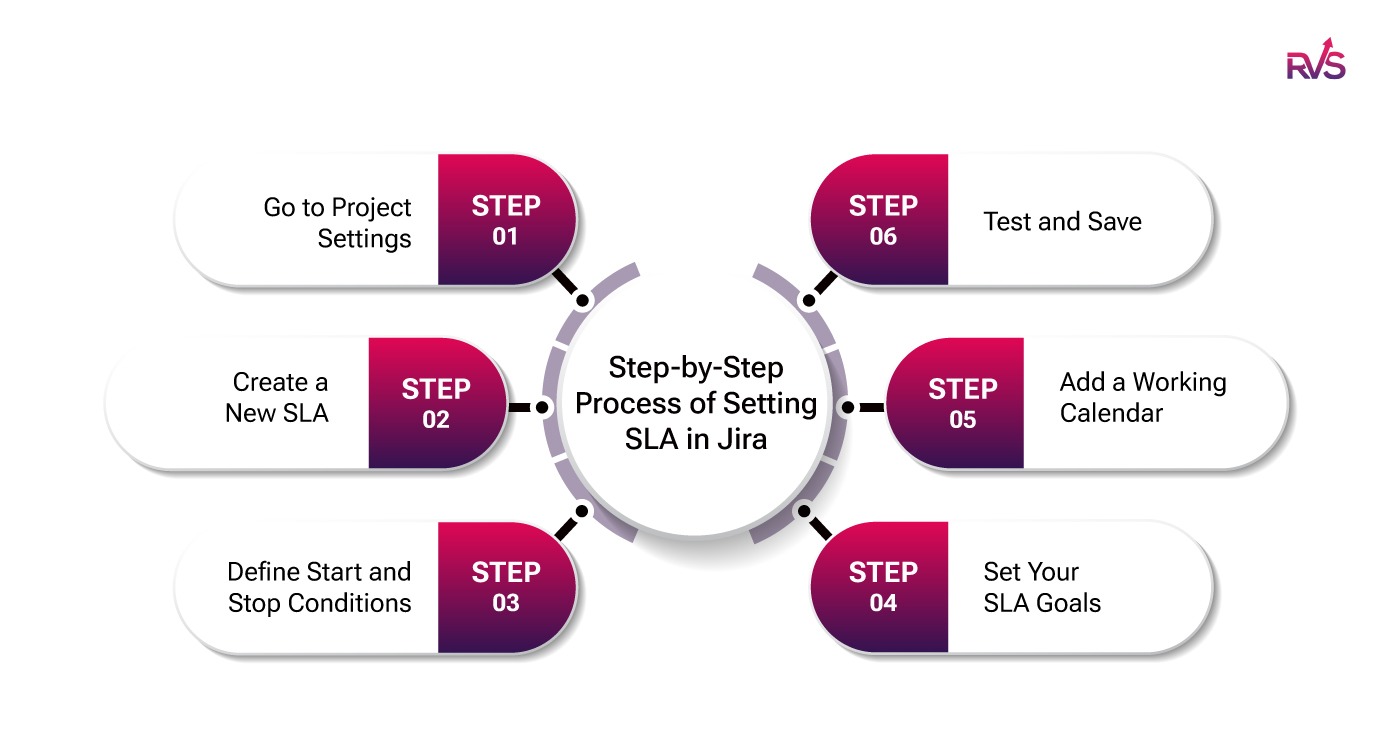
How to Set Up SLA in Jira (Step-by-Step)
Step One: Go to Project Settings: Open your project in Jira Service Management → Click on Project Settings → SLAs.
Step Two: Create a New SLA: Click Add SLA and name it (for example, Time to Resolution or First Response Time).
Step Three: Define Start and Stop Conditions: Choose triggers for when your SLA should begin and end.
Start: When the issue is created or assigned.
Stop: When the status changes to “Resolved” or “Closed.”
Step Four: Set Your SLA Goals: Add target times based on issue priority.
Critical: 4 hours
High: 8 hours
Medium: 16 hours
Step Five: Add a Working Calendar: This ensures you calculate SLA in Jira within business hours. You can define weekdays, working hours, and holidays.
Step Six: Test and Save: Once set, apply the SLA to existing issues to ensure it tracks correctly. You can then view the SLA panel within each issue to see countdowns and breach warnings.
Common SLA Metrics You Should Track
Tracking the right metrics ensures teams focus on what truly impacts performance. Here are four key SLA metrics:
Time to First Response: Measures how quickly your team acknowledges a request. Essential for customer satisfaction.
Time to Resolution: Tracks the total time taken to resolve an issue.
Customer Wait Time: Measures how long an issue waits for customer feedback — helpful for finding delays outside your team’s control.
Reopen Rate: If issues frequently reopen after closure, your SLA targets may be too tight or unrealistic.
How to Monitor SLA Performance in Jira
Monitoring your SLA compliance is as crucial as setting it up. Here’s how to do it effectively:
Jira Service Management Reports
You can view SLA performance through built-in reports that show how many tickets met or breached SLAs.
Go to Reports → SLA Reports to track trends over time.
Custom Dashboards
Create dashboards using Jira filters and gadgets like “SLA Metrics” or “Time to Resolution.” Customize visuals for better clarity.
SLA Breach Alerts
Enable SLA breach notifications so teams can act before a breach occurs. Use automation rules to send alerts via email or Slack.
Add-ons for Advanced Tracking
Time in Status add-ons track how long tickets stay in each workflow status, helping diagnose SLA failures and identify bottlenecks for improved process efficiency.
If you’re wondering how to monitor SLA breaches in Jira Service Management, the combination of dashboards, alerts, and add-ons gives you full visibility and control.
Using SLA Automation in Jira
Automation helps teams maintain SLA compliance without manual effort. Here’s how you can use SLA automation in Jira to save time:
Auto-assign tickets based on SLA priority or issue type.
Send reminders when an SLA is close to breaching.
Auto-escalate issues to managers if an SLA is breached.
Change issue status automatically when SLA conditions are met.
Example automation rule:
If “Time to Resolution” SLA is breached → Change issue status to “Escalated” → Notify the manager.
Automation ensures that SLAs aren’t just numbers but active triggers that keep your workflows running smoothly.
Tips to Improve SLA Compliance
Keeping your team aligned with SLA goals requires continuous monitoring and process refinement. Try these tips:
Set Realistic Goals: Match SLA targets with actual team capacity and ticket complexity.
Automate Notifications: Use SLA automation to trigger alerts and prevent breaches.
Analyze Time in Status: Identify stages where tickets get delayed and optimize workflows.
Review Performance Weekly: Hold short review meetings to discuss SLA compliance trends.
Common SLA Mistakes to Avoid in Jira
Even experienced teams make configuration errors that lead to false data or missed deadlines. Here are the common SLA mistakes to avoid in Jira:
Setting Unrealistic Targets: Overly strict SLAs demotivate teams and inflate breach counts. Always align with real-world capacity.
Ignoring Business Hours: Failing to configure calendars causes SLA clocks to run 24/7 — making reports inaccurate.
No Pause Conditions: When tickets wait for customer input, the SLA timer should pause. Without it, teams appear slower than they are.
Lack of Automation Alerts: Without SLA automation, breaches often go unnoticed until it’s too late.
Not Reviewing Reports Regularly: SLAs evolve as your business grows. Review performance monthly to stay on track.
Avoiding these mistakes ensures your SLA in Jira remains accurate, efficient, and aligned with your real workflows.
Final Checklist for Effective SLA Management
Define clear SLA goals for each issue type.
Configure calendars for accurate working hours
Automate SLA alerts and escalations
Monitor dashboards weekly for breach trends
Use tools for advanced reporting and tracking.
When all these pieces come together, your Jira environment becomes more predictable, transparent, and accountable — a true foundation for high-performance teams.
Conclusion
Effective SLA in Jira management ensures your team delivers consistent, on-time service and builds client trust. By understanding SLA mechanics, setting measurable goals, and embracing SLA automation in Jira, you can prevent delays and streamline performance monitoring.
But to truly maximize efficiency, you need data-driven insights. With the right time-tracking, workload visibility, and capacity planning tools, you can move beyond basic SLA tracking and gain complete control over your operations.
Ready to streamline your workflow and make smarter decisions? Start exploring the right tools today.
Frequently asked questions
1. What is an SLA in Jira, and why is it important?
An SLA (Service Level Agreement) in Jira defines the expected response or resolution time for issues. It helps teams enforce support standards, measure performance, and ensure customer commitments are met.
2. How do I set up SLA rules in Jira?
You can set up SLA rules by navigating to Project Settings → SLAs, defining start and stop conditions, adding time goals, and applying them to specific issue types using filters or JQL.
3. Can I track SLA performance in Jira Service Management?
Yes. Jira Service Management provides built-in SLA tracking, countdown timers, and SLA reports that show breaches, average resolution time, and agent performance metrics.
4. How do I pause SLA timers in Jira?
SLA timers can be paused using conditions such as "Waiting for Customer" or custom statuses. You can configure pause rules in the SLA settings under “Calendar” or via JQL conditions.
5. What are the best practices for managing SLAs in Jira?
Use clear start/stop triggers
Set different SLAs for different priority levels
Automate SLA breach alerts
Review SLA reports regularly
Align SLA goals with real customer expectations
6. How do I create SLA reports or dashboards in Jira?
You can create SLA reports using built-in Jira gadgets, or use dashboards with widgets like “Time to Resolution,” “Issues Breached,” or “SLA Met vs Breached” to monitor team performance.
7. Do I need an add-on to track advanced SLAs in Jira?
Jira Service Management supports basic SLA tracking, but for advanced SLA analytics (like historical breakdowns, agent-wise SLA performance, or custom charts), third-party apps may be required.
Recent Blogs
July 9, 2026
Best Jira Time Tracking Apps to Boost Team Productivity (2026)